


Make your own Mask

Originally Published on Instructables.com
Supplies Needed
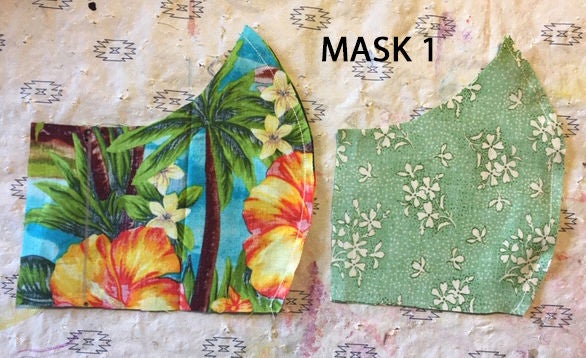
Mask 1 is fitted, with 2 layers of fabric and a pocket between them for an optional filter (see research links for info on filters). It is held on by elastic ear loops. Elastic can also be threaded to fit around the head.
Mask 2 is fitted, with 2 layers but no pocket, and is easier to make.
seam allowances are ¼” unless noted
MASK 1 & 2 supplies (child, regular and large size):
9" x 15" fabric outer layer
9" x 15" fabric lining layer
(3 regular or large size masks of either design, can be made from 1/4 yard (9") of 45” wide fabric)
3” piece of soft wire (this can be decorative wire as shown, or picture wire, or even a paper clip if that's all you can find)
approx. 22” of elastic cord (child size length 10", regular size length 11-12", large size length 13")
WHAT KIND OF FABRIC?
You can choose any tightly woven cotton or cotton/poly fabric you like. Hold it up to the light to see how tight the weave is. Use the same fabric for outer and lining if you want, or use different ones to help you remember which side is clean and which dirty.
The research (see links at the end) shows 100% cotton having some effectiveness. Cotton/polyester blends may have additional properties of repelling water, making them better barriers to keep droplets from soaking through outer layers.
Don't use stretchy, sequined or velvet material.
Wash all fabrics before sewing to pre-shrink, and to assure you are working with the most sanitary materials possible.
Step 1: Pattern, Cut, Center Seam

Print out PDF paper pattern piece(s) at actual size on 8.5” x 11” paper. For MASK 1 print file called "Mask 1 reg size pattern". It has 2 pieces: A (outer) and B (lining) . For MASK 2, print either "Mask 2 reg size pattern" or "Mask 2 large pattern" or "Mask 2 child pattern". It just has one piece. At this time I don't have a large or child size pattern for a Mask 1. Will work on that. Cut out the paper pattern pieces.
ABOUT PRINTING THE PATTERNS:
- For those without a printer - open up the gridded pattern PDF so you can draw it yourself
- Here are the measurements for reference Don't stress about 1/8" variations on your printed patterns. There is wiggle room in the design:
- Mask 1 piece A is 6 3/8" h x 5.25" w. at the bottom B is 6 3/8" h x 4.25" w at the bottom
- Mask 2 child is 5.25" h x 4 7/8" w and the bottom
- Mask 2 regular is 6.25" h x 5.5" w at the bottom
- Mask 2 large is 6.75" h x 6" w at the bottom - Instructables community member Winko made scalable files for masks 1 and 2. Go to this link and open the pattern you want in your browser. There is a drop down menu with print sizing options, including a customizable one.
- European paper size: I've been told that the paper size in Europe is DIN4 and you need to adjust the scale to 107%.
..................................................................
MASK 1
Layer your fabrics right sides together.
Pin pattern(s) to folded fabrics and cut two A and two B. Transfer the 2 dots from pattern onto the two A pieces on wrong side of fabric. Pencil a line between them lightly on each piece.
MASK 2
Layer your fabrics right sides together.
Pin pattern piece to folded fabrics (outer and lining). Cut 4.
Sew center curves of outer layers, right sides together. Sew center curves of lining layers, right sides together. Clip the curved seam at about ½” intervals but not down to the seam.

Step 2: MASK 1 Sides, Sleeves for Elastic


For MASK 1 (with pocket)*
Fold straight sides of lining fabric toward wrong side, and sew fold down with straight stitch.
On outer layer sides, fold top and bottom corners down, using the dotted lines on pattern and the transferred dots as guides. Pin. Fold raw edge over and pin. Ironing helps keep this in place. Stitch along all the 3 folds on each side, 1/8” from fold.
Make the sleeves for the elastic - With wrong side up, fold angled, stitched ends of outer layer up to the pencil line. Stitch down.
*To see a video of someone making this mask, go here. This was made by Instructables community member Sabrinayaya, who is not only an RN, she is also sewing masks for her hospital and made this video for us. Rock star! Note about her video: She mentions using paper clips for nose wire but I recommend against that. Paper clips break too easily. And she sews the elastic into a loop. I recommend tying the elastic so that it is more adjustable and so that it can be looped on the ears OR around the back of the head.
And here's another video demonstration of someone sewing Mask 1, by Nancy Beers or Parry Sound, Ontario, Canada. Thank you Nancy!
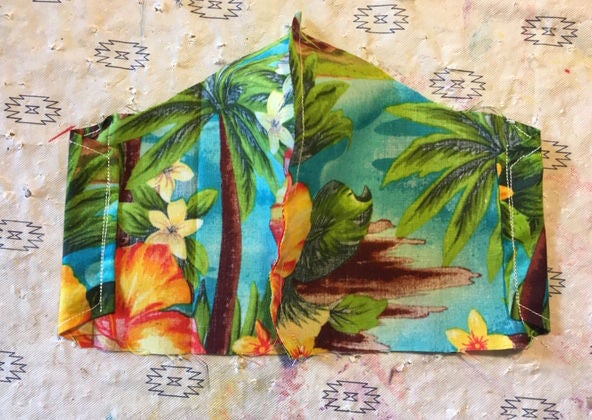
Step 3: MASK 1 Connect Layers, Elastic


Lay inner layer over outer layer, right sides facing in. Sew the top edge and the bottom edge. Clip curved seam.
Turn right side out. Top stitch the top and bottom seams, 1/8” from edge. This will assure both layers stay in place during laundering.
Feed elastic through the sleeves (approx. 11” per side). A wire needle or small safety pin can help feed it through.
Step 4: MASK 1 Nose Wire, Elastic, Filter

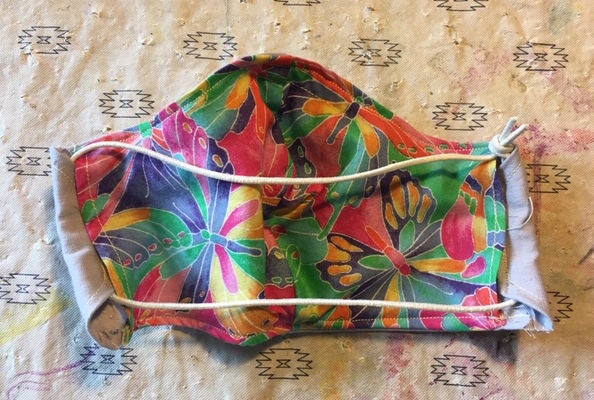

Make a channel to hold the nose wire by stitching a line 1/4” from the top stitch line, echoing the curve (2” on each side). Slide a 3”ish piece of wire into the slot created (loop the ends first with pliers if they are sharp). Sew the ends of the channel closed.
Tie ends of elastic into loops and fit mask to your head by tucking loops behind ears. Adjust knots as needed. It should fit snugly but not pull on your ears. If desired, you can make the elastic go around the back of the head. Don't cut the elastic in half. Feed each end of the 16" length through the sleeves in a U shape. Tie together and fit mask. Adjust knot as needed for snug fit.
Bend the wire to fit snugly over the bridge of your nose.
Optional: If you have a suitable filter material, you can increase the filtering capacity by slipping this material into the pocket between the outer layer and the lining. Cut whatever filter material to fit as needed. See research notes for more about what might be suitable.
Step 5: MASK 2 Instructions


For MASK 2 (easier, no pocket)
Pin right sides of outer and lining layers facing each other. Sew all the way around the edge, except for a 1.5" gap on the bottom edge. Turn right side out and press.
Note - the pointy end of an ironing board is the perfect size and shape to press these masks on.
Sew the wire channel, 1/2" down from edge and 2" to each side of the center seam. See picture.
Slide the wire through the turning hole, into the wire channel. Stitch the ends of the channel closed so it won't move around when washed.
Top stitch 1/8" around the entire mask, closing up the turning hole as you do.Be careful of the wire. You can skip that section of top stitching if there isn't enough room to go above the wire.
Lay mask with lining side up on table and fold 1" of each end of the mask toward the center. Pin and sew, making the elastic channels.
See Step 4 of MASK 1 for how to thread the elastic.
Step 6: Conclusion & About Us
Conclusion:
We recommend making 3 masks per person: one to wear, one in the wash, one for a spare or to share. Remember, always remove the mask carefully. Do not reach under the mask with dirty hands. Touch dirty to dirty, clean to clean. Wash your hands and face immediately after removing mask. For best results in cleaning masks - immediately upon removing, spray the front and back with hydrogen peroxide to kill germs, then wash in soap and hot water.
About us:
We are artist Jen Murphy, and medical professional Sabra Stein. We are worried about protecting our family and friends from contagious disease. Help from other friends have further developed the sizes and the new simpler MASK 2 design. Thanks Chris and Sheila!
We adapted this design from several sources online, including Craftpassion.com. New information about the disease is released daily. This is what we think is the best way to do it as of the latest update.
We make NO CLAIMS that these masks will protect you from covid19. Use at your own risk.
Note from Jen:
Since creating this tutorial and getting featured in Forbes Magazine (Thank you TJ McCue!), it has gotten a crazy number of views, comments and questions. I appreciate all the tips and clarifications you all have brought in. Together we have made it better. That's what is awesome about instructables and the worldwide community of makers. What I've learn from you guys has gone into the masks we designed for the Masks of Love project in my hometown.
Step 7: Research Links
These are the places I got my info, as well as talking to medical workers. Do your own research and please share in comments if you find new relevant information.
Most important article, please read even if you don't read anything else:
How to put on and remove a face mask https://www.sfcdcp.org/communicable-disease/health...
STUDIES
Oxford Academic 2010 https://academic.oup.com/annweh/article/54/7/789/2...
University of Cambridge 2013 https://www.researchgate.net/publication/25852580...
National Institute of Health 2013 https://www.ncbi.nlm.nih.gov/pmc/articles/PMC3785..
CDC INFO ON CLOTH MASKS
CDC instructions for simple mask.
https://wwwnc.cdc.gov/eid/article/12/6/05-1468_art...
Low on actual instructions, high in scientific reference. This is their official word about cloth masks:
"Unlike NIOSH-approved N95s, facemasks are loose-fitting and provide only barrier protection against droplets, including large respiratory particles. No fit testing or seal check is necessary with facemasks. Most facemasks do not effectively filter small particles from the air and do not prevent leakage around the edge of the mask when the user inhales.The role of facemasks is for patient source control, to prevent contamination of the surrounding area when a person coughs or sneezes. Patients with confirmed or suspected COVID-19 should wear a facemask until they are isolated in a hospital or at home. The patient does not need to wear a facemask while isolated."
CDC "Strategies for Optimizing the Supply of Facemasks:
https://www.cdc.gov/coronavirus/2019-ncov/hcp/ppe-...
Step 8: Filters


There is controversy and confusion about using filters in the masks and what type. After reading and talking to medical experts that I trust I think the best solution for do it yourself mask makers is the premium grade HEPA HVAC filters you can get at your local big box. The brand I found is Filtrete but there are others. Read the package to make sure that it filters viruses.
How to make mask filters from a furnace filter:
1. Using a box cutter or knife, carefully cut the cardboard frame off the filter. The wire mesh is sharp! You might want to wear work gloves. There are glue dabs on each side of the white accordion folded fabric holding it to the mesh. Pull back the mesh and pull the fabric away from the glue on all sides. When loose, pull the fabric out of the frame. My husband cut his hand doing this. Be careful. Sorry, I did not get any pictures of this part.
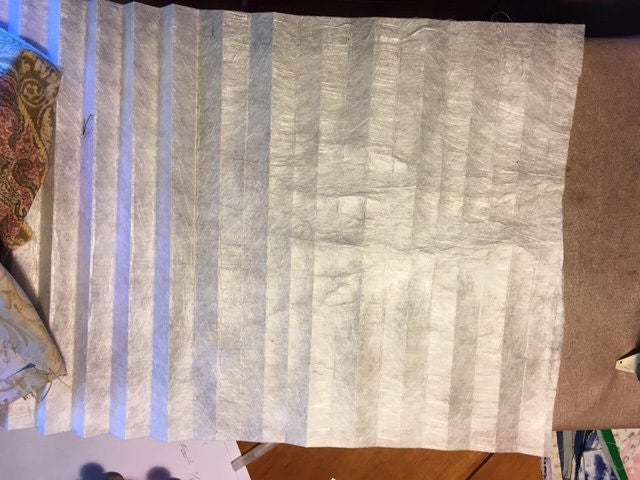
2. Remove any remaining glue bits from the filter fabric. Cut a piece of smooth cotton cloth bigger than the width of the filter fabric (a pillow case works). Set up your iron on an ironing board or a table top with a towel on it.
3. Lay the cloth over the filter fabric. DO NOT TOUCH THE IRON TO THE FILTER FABRIC. It will melt in a hot second, stick to your iron, and ruin that spot on the fabric. Press down through the cotton fabric with a medium hot iron, and iron those accordion pleats flat. This takes a while and they never go away completely. I did it for 3 to 5 min per section, flipping the filter fabric over several times.
4. Make a template for the mask. How big it is depends on what size mask you made and any variations in the seam allowances etc. Using a piece of paper cut the basic shape and try it inside your mask until you get it to fit smoothly. Cover all of the area that you will breathe through, plus a little more. It doesn't need to go all the way under your chin or out to the edge of your cheeks since those areas are pressed flat against your face by the mask. Once you have the right shape, trace it onto thicker paper and cut out.
5. Trace the template with a sharpie onto the ironed filter fabric. Fit as many as you can into the space.
6. Cut them out.
These filters will not maintain their effectiveness after washing, unfortunately. So cut out a whole bunch and replace each time you wear the mask. Though remember - these masks are already 50% and up better protection than no mask, even without a filter. Also please NOTE - when you take the filter out, the out facing side is potentially dirty with virus particles, so immediately throw it away safely, and wash your hands.
More info about FILTERS:
This is what is inside an N95 mask according to: https://www.accessdata.fda.gov/cdrh_docs/pdf12/K1...
"[It] is flat-folded and expands into a convex-shaped mask with polyamide/spandex elastic head-loops to secure the mask to the user's face, and a malleable aluminum strip positioned above the nose fora tighter seal around the nose and face. The respirator is comprised of four layers of material: an outer layer of spun-bond polypropylene, a second layer of cellulose/polyester, a third layer of melt-blown polypropylene filter material and an inner (fourth) layer of spun-bound polypropylene...The outer active layer of the respirator is coated with a hydrophilic plastic. The second inner layer is treated with copper and zinc ions. Both layers inactivate influenza viruses using different mechanisms of action." So if you can reproduce some of these protective elements you are increasing effectiveness. Let's look at them one by one:
Spun-bond polypropylene is a textile material that is composed of thermally bonded, continuous filaments in a web-like structure. Here is a list of things that use spun bond polypropylene/polyester, including weed cover and mattress covers: http://www.excelnonwovens.com.au/spunbond-polypro...
Cellulose/polyester - what it is http://www.excelnonwovens.com.au/spunbond-polypro... Clean room wipes like this would probably work and they are a good size already. But they may also be in short supply. I'm going to try and buy some.
melt-blown polypropylene - made of micro- and nanofibers where a polymer melt is extruded, forming a nonwoven sheet product applicable for filtration and apparels. Still working on finding accessible examples of this.
This could be a game changer. "made by crossing and aligning fine nanofibers to create small air holes that block viruses while allowing for easy breathing". Not approved by the South Korean government yet. Meant to be slid into washable masks. Keep an eye on these developments
Step 9: Community Sewers!
"We've gone through ... six months of personal protective equipment in just seven days"
I've been working long hours to get my own area's community mask sewing project going, along with the help of many amazing people most of whom I just met! It is using the same pattern as in this instructable but with a few refinements and better pictures: https://masksoflovewnc.weebly.com If you are in Western North Carolina, please join us.
There are many community efforts to make masks for medical centers in need, and more popping up every hour. Google "community sewing masks" and see what you get. Some have their own pattern they want you to use. Some have specific brands of materials. Dig around for the details on the individual pages:
Volunteers Nationwide Sew Masks for Health Care Workers
https://abcnews.go.com/US/wireStory/volunteers-sew...
Get PPE to Health Care Workers (nationwide effort to redistribute commercially made masks and other PPE)
Nationwide clearinghouse for masks and other PPE
.................................
Sault Saint Marie, Ontario Canada
Sault Area Hospital used this instructable as their official pattern! (Sabrina, who made the video for Mask 1, is sewing masks for this effort) https://www.saultstar.com/news/local-news/sah-look...
Tucson, AZ https://www.lovemendingsouls.org/covid19-masks-he...
BlueCross Minnesota, state wide https://blog.bluecrossmn.com/covid19masks/
Wise Health System, Decatur, TX https://www.facebook.com/WiseHealthSystem/
story about the Decatur project: https://www.wsbtv.com/news/local/volunteers-sewing...
Stillwater, OK https://www.facebook.com/StillwaterMedicalCenter/p...
Staten Island NY https://www.instagram.com/p/B99lFzKFMoH/
Redwood City CA https://mynewredshoes.org/covid19-response
Albany, GA https://www.facebook.com/PhoebePutney/
These guys opened the #millionmaskchallenge floodgates yesterday and have now stopped accepting the masks for now. Got all they needed. Evansville, IN https://www.deaconess.com/How-to-make-a-Face-Mask
Cedar Rapids, Iowa https://www.unitypoint.org/cedarrapids/sewing-surg...
Do you have n95 to spare? Contact Holly Figueroa O'Reilly at bwcs2020@protonmail or text (240) 844-2514
Buffalo, NY https://www.wkbw.com/news/coronavirus/face-masks-k...
Rochester, NY http://robertjeffery.us/workfromhome/
Edegem, Belgium (in Dutch) https://www.uza.be/mondmaskers
This page https://community.babycenter.com/post/a75471737/ur.. has a short list of community sewing efforts and a google doc getting compiled (not much on it yet). A central, frequently updated list would be super useful: https://docs.google.com/spreadsheets/d/1v9fmIOUCL...

